Console Server
Gregory Bond
$FreeBSD: head/en_US.ISO8859-1/articles/console-server/article.xml 39632 2012-10-01 11:56:00Z gabor $$FreeBSD: head/en_US.ISO8859-1/articles/console-server/article.xml
39632 2012-10-01 11:56:00Z gabor $
FreeBSD is a registered trademark of the FreeBSD Foundation.
Cisco, Catalyst, and IOS are registered trademarks of Cisco Systems, Inc. and/or its affiliates in the United States and certain other countries.
Intel, Celeron, EtherExpress, i386, i486, Itanium, Pentium, and Xeon are trademarks or registered trademarks of Intel Corporation or its subsidiaries in the United States and other countries.
Lantronix and EasyIO are trademarks of Lantronix Corporation.
Microsoft, IntelliMouse, MS-DOS, Outlook, Windows, Windows Media and Windows NT are either registered trademarks or trademarks of Microsoft Corporation in the United States and/or other countries.
Motif, OSF/1, and UNIX are registered trademarks and IT DialTone and The Open Group are trademarks of The Open Group in the United States and other countries.
Sun, Sun Microsystems, Java, Java Virtual Machine, JavaServer Pages, JDK, JRE, JSP, JVM, Netra, OpenJDK, Solaris, StarOffice, Sun Blade, Sun Enterprise, Sun Fire, SunOS, Ultra and VirtualBox are trademarks or registered trademarks of Sun Microsystems, Inc. in the United States and other countries.
Many of the designations used by manufacturers and sellers to distinguish their products are claimed as trademarks. Where those designations appear in this document, and the FreeBSD Project was aware of the trademark claim, the designations have been followed by the “™” or the “®” symbol.
- Table of Contents
- 1 The Problem
- 2 Possible Solutions
- 3 Our Solution
- 4 Setting Up The Server
- 5 Cabling
- 6 On Sun Systems And Break
- 7 Using a Serial Console on FreeBSD
- 8 Security Implications
- 9 On Conserver Versions
- 10 Links
- 11 Manual Pages
1 The Problem
You have a computer room with lots of UNIX® server machines and lots of communications hardware. Each of these machines needs a serial console. But serial terminals are hard to find and quite expensive (especially compared to a much more capable PC). And they take up a lot of precious space in the computer room.
You need access to the console because when things break, that is where error messages go. And some tasks have to be done on the console (e.g. boot problems or OS installs/upgrades). Some UNIX systems allow the console to break out to the ROM monitor which can sometimes be the only way to unstick a hung machine. This is often done with a LINE BREAK sent on the console serial port.
If we are going to play about with consoles, then there are a couple of other things that would be great:
-
Remote access. Even in the same office, it would be convenient to access all the consoles from your desk without walking into the computer room. But often the machines are off-site, perhaps even in another country.
-
Logging. If something has gone wrong, you would like to be able to have a look at the previous console output to see what is up. Ordinary console screens give you the last 25 lines. More would be better.
-
Network Independence. The solution needs to work even if the network is down. After all, a failed network is when you need consoles the most! Even better is network independence with remote access.
-
No single-point failure. A console system that crashes every machine when it fails is no use. This is particularly tricky with Sun UNIX hosts as they will interpret a powered-off terminal as a BREAK, and drop back to the ROM monitor.
-
Interface with a pager or some similar alerter device.
-
Ability to power-cycle machines remotely.
-
Not be too expensive. Free is even better!
2 Possible Solutions
If you use PC hardware for your servers, then a so-called “KVM switch” is one possible solution. A KVM switch allows the use of a single keyboard, video screen and mouse for multiple boxes. This cuts down on the space problem, but only works for PC hardware (not any communications gear you might have), and is not accessible from outside the computer room. Nor does it have much scroll-back or logging, and you have to handle alerting some other way. The big downside is that it will not work for serial-only devices, such as communications hardware. This means that even with a room full of PC-based servers, you are probably still going to need some sort of serial console solution.
Note: Actually, Doug Schache has pointed out that you can get KVM switches that also do serial consoles or Sun compatible KVM switching as well as PCs, but they are expensive. See Avocent for example.)
You might be tempted to do without a console terminal, but when things go pear-shaped you really need to see what is on the console. And you have to use the console to boot the machine and do things like OS upgrades or installs.
You might try having a single console terminal and switching from server to server as needed, either with a serial switch or just by patching it into the required machine. Serial switches are also hard to come by and not cheap, and may cause problems with sending BREAK when they switch. And (if your computer room is anything like ours) you never seem to have the right combination of patch leads to connect to the machine you need to, and even if the leads are there you can never work out exactly which combination of DTE/DCE headshells goes with which lead goes with which hardware. So you spend the first 10 minutes fooling around with breakout boxes and a box of leads, all while the server is down and the users are screaming. Of course this does not deal with the logging or remote access requirements. And inevitably the console is not switched to the machine you need so you lose all the console messages that might tell you what is going on.
One popular solution is to use terminal server hardware. Typically, the serial ports are connected to the various machine consoles, and set up for “reverse telnet” access. This means a user can telnet to a given IP/port and be connected to the appropriate console. This can be very cost-effective, as suitable old terminal servers can be picked up fairly cheaply (assuming you do not have a couple lying around). And it is of course network-accessible so suitable for remote access. But it suffers from one major drawback: if the network is down, then you have no access to any console, even if you are standing right next to the machine. (This may be partially alleviated by having a suitable terminal connected to one of the terminal server ports and connecting from there, but the terminal server software may not support that.) Also there is no logging or replay of console messages. But with a bit of work, and the addition of some software such as conserver (described below), this can be made to work pretty well.
A possibility suggested by Bron Gondwana is similar to the above solution. If you use servers with multiple serial ports, you can connect each spare serial port to the console port of the “next” server, creating a ring of console connections (in some sort of order). This can be made to work reasonably well with the aid of the conserver software, but can be a bit confusing otherwise (i.e. remembering which port is connected to which console). And you are stuck if you need to use serial ports for other things (such as modems) or you have machines without spare ports.
Or, if your budget exceeds your willingness to hack, you can buy an off-the-shelf solution. These vary in price and capability. See, for example, Lightwave, Perle, Avocent or Black Box. These solutions can be quite expensive - typically $USD100 - $USD400 per port.
3 Our Solution
In light of the above requirements, we chose a solution based on a dedicated PC running UNIX with a multiport serial card, and some software designed to handle serial consoles.
It includes the following elements:
-
A surplus PC. We used a Pentium® 166, with a PCI bus, 2Gbyte hard disk and 64Mb of RAM. This is a massive overkill for this task, and P-100, 500Mb, 32Mb would be more than enough.
-
A PC UNIX system. We used FreeBSD 4.3 as that is used for other tasks within our office.
-
A multi-port serial card. We chose the EasyIO™ PCI 8-port card from Stallion Technologies. This cost us about $AUD740, or under $100/port, from Harris Technologies (which has lots of stuff but is by no means the cheapest place in town - shop around and you might get it a lot cheaper). This card has a big DB80 connector on the back, and a cable plugs into that which has a block with 8 RJ-45 sockets on it. (We chose the RJ-45 version as our entire cable plant is RJ-45. This allows us to patch connections from the required box to the console server without any special cables.) This is the only thing we needed to buy to make this all happen.
-
We build two servers, one for each computer room, with 8 ports in one and 16 ports (via two EasyIO PCI cards) in the other. If we needed more than 16 ports, then another of the Stallion cards would be more cost-effective. We could conceivably support 128 ports in each server (with 2 EasyConnect 8/64 host cards and 8 16 port RJ-45 modules) for about $AUD12,000.
-
A modem for remote access to the console server host when the network is down. We have not done this yet as the computer room is next door, but when we put a server in Sydney we will add the modem. The idea is that when the network is down, you can dial up and log into the server machine and run the console program locally. For security, we will probably leave the modem powered off and ask the gopher in Sydney to turn on the well-labelled button when we need it.
-
A program called conserver. This program does all the magic required to enable remote access to consoles, and do the replaying and logging etc. It comes in two parts: a server called conserver that runs as a daemon and connects to the serial ports, handles logging etc, and a client program called console that can connect to the server, display console messages, send keystrokes (and BREAK), etc.
This design covers all the major requirements except remote power cycling:
-
Remote access comes because the console client program works across the network.
-
Logging is handled by the conserver program.
-
If the network is down, then we can use the console on the PC to run the console client locally. For remote sites, we can add a modem for dial-in access to the server command line to run the client.
-
By patching the Solaris™ servers (see Section 6), we can avoid pranging the whole computer room when the console server PC crashes (or the power supply fails, or whatever).
-
We already have pager alerts from another system we have installed, but the console server has all the required log info so that could easily be implemented if we needed. And it even has a modem for calling the pager company!
-
We do not currently support remote power cycling. Some versions of the conserver program support this, but it does require specialised serial-controlled power boards. We have no immediate need for remote power cycling (we have a gopher in each remote office who can do it by remote control) so this is not a major problem, and we could add it easily should we ever see the need and get the appropriate hardware.
-
This solution was very cheap. Total cost for the 9-port server was $AUD750 for the IO card, as we re-used a surplus PC and already owned the hardware for the special cables. If we had to buy everything, then it would still only cost around $AUD1500 for the 8-port server.
4 Setting Up The Server
4.1 Checking the Stallion driver
FreeBSD has adequate support for modern Stallion cards since 4.4 release. If you are running an older version of FreeBSD, you will need to upgrade to a more modern version of FreeBSD (which you should do anyway, to make sure your system is not vulnerable to known security issues). See the FreeBSD Handbook for information about updating your system.
4.2 Configuring a new kernel
The Stallion driver is not included in the default GENERIC kernel, so you will need to create a kernel config file with the appropriate entries. See stl(4) and the appropriate section of the FreeBSD Handbook.
4.3 Making The Devices
You will need to make the device notes for the Stallion card (which are not made by default). A new version of /dev/MAKEDEV with Stallion support will have been created by the mergemaster run during the above procedure. If you have a Stallion card with more than 8 ports, then you will need to edit /dev/MAKEDEV and change the definition of maxport at about line 250. By default, MAKEDEV only makes device nodes for 8 ports to keep the size of the /dev directory down.
Run a command like:
# cd /dev/ && sh MAKEDEV cuaE0to create dial-out devices for the first Stallion card. See the comments in MAKEDEV and the stl(4) man page for more details.
4.4 Compiling conserver
Note: See the section on conserver versions Section 9; the version I use is available in the FreeBSD ports collection; however, it is not the only one.)
There are two ways to install conserver. You can either compile from the source or use the FreeBSD ports framework.
4.4.1 Using the ports framework
Using the ports is a bit cleaner, as the package system can then keep track of installed software and cleanly delete them when not being used. I recommend using the comms/conserver-com port. Change into the port directory and (as root) type:
# make DEFAULTHOST=consolehost install
where consolehost is the name of the machine running the console server. Specifying this when the binary is compiled will avoid having to either specify it each time the program is run on remote hosts or having to maintain a conserver.cf file on every host. This command will fetch, patch, configure, compile and install the conserver application.
You can then run make package to create a binary package that can be installed on all the other FreeBSD hosts with pkg_add(1). For extra style points, you can make a two versions of the package: one for the console server machine without a DEFAULTHOST argument, and one for all the other hosts with a DEFAULTHOST argument. This will mean the console client program on the console server machine will default to localhost, which will work in the absence of name servers when the network is busted, and also allow “trusted” (i.e. no password required) connections via the localhost IP address for users logged into the console server machine (either via the console screen or the emergency backup modem). The version for the other machines with a DEFAULTHOST argument means users can just use the console client without specifying a hostname every time, and without needing to configure the conserver.cf file on every machine.
4.4.2 From the source tarball
If you prefer, you can download conserver and compile it yourself. You might need to do this if you want to install the console client on non-FreeBSD systems. We run the client on our Solaris hosts and it inter-operates with the FreeBSD-hosted server with no problems. This allows anyone in the whole company (many of whom have PCs and no FreeBSD host access on their desk) to access the console server.
Download the file from the conserver.com FTP site. Extract it into a handy directory then configure it by running
% ./configure--with-master=consoleserver--with-port=782
The --with-master argument avoids having to specify
the master server every time the client is run remotely (or keeping up-to-date
config files on all remote hosts). The --with-port
argument avoids having to update /etc/services on every
machine.
Then type make and, as root, make install.
4.5 Configuring conserver
The conserver program is configured via a file called conserver.cf. This file usually lives in /usr/local/etc and is documented in the conserver.cf(5) manual page.
Our config file looks like this:
LOGDIR=/var/log/consoles
gallows:/dev/cuaE0:9600p:&:
roo:/dev/cuaE1:9600p:&:
kanga:/dev/cuaE2:9600p:&:
%%
allow:  itga.com.au
trusted:        127.0.0.1 buzz
The first line means all the console log files by default go into the /var/log/consoles directory. The “&” in each line says the log file for that machine will be /var/log/consoles/machine.
The next three lines show three machines to which we need to connect. We use the cuaEx devices rather than the ttyEx devices because console ports typically do not show carrier. This means that opening ttyEx would hang and conserver would never connect. Using the cuaEx device avoids this problem. Another solution would be to use the ttyEx devices and enable “soft carrier” on these ports, perhaps by setting this using the ttyiEx device in the /etc/rc.serial file. See the comments in this file for more details. Also see sio(4) for information on the initial-state and locked-state devices. (The Stallion driver also supports these conventions). And see the stty(1) for details on setting device modes.
The last section shows that any user logged into the server machine has passwordless access to all consoles. We do this because there are no user accounts on this machine and it is safely isolated from the wide world behind our firewall. The allow line allows anyone on a machine inside our organisation to access the console server if they provide their password, which is recorded in the conserver.passwd file (see next section).
4.6 Setting conserver passwords
The conserver.passwd file contains the encrypted version of the password that each user. The file is documented in the conserver.cf(5) manual page.
The only tricky bit is loading the file with encoded passwords. It appeared in FreeBSD that was is no obvious way to generate an encrypted password for inclusion in another file (but see below). So I put together a quick hack perl script to do this:
@rands = ();
foreach (0..4) {
        push(@rands, rand 64);
}

$salt = join '', ('.', '/', 0..9, 'A'..'Z', 'a'..'z')[@rands];

$salt = '$1$' . $salt . '$';

print 'Enter password: ';
`stty -echo`;
$cleartext = <>;
`stty echo`;
chop($cleartext);
print crypt($cleartext, $salt), "\n";
Note: This uses the FreeBSD MD5-style encrypted passwords. Running this on other UNIX variants, or on FreeBSD with DES passwords, will likely need a different style of salt.
Kris Kennaway <kris@FreeBSD.org> has since pointed out you
can get the same effect using the openssl passwd
command:
% openssl passwd -1
Password: password
$1$VTd27V2G$eFu23iHpLvCBM5nQtNlKj/
4.7 Starting conserver at system boot time
There are two ways this can be done. Firstly, you could start up conserver from init by including an entry in /etc/ttys that is similar to this:
cuaE0 "/usr/local/sbin/conserver" unknown on insecure
This has two advantages: init will restart the master console server if it ever crashes for any reason (but we have not noticed any crashes so far), and it arranges for standard output of the conserver process to be directed to the named tty (in this case cuaE0). This is useful because you can plug a terminal into this port, and the conserver program will show all console output not otherwise captured by a client console connection. This is useful as a general monitoring tool to see if anything is going on. We set this terminal up in the computer room but visible from the main office. It is a very handy feature. The downside of running conserver from the ttys file is that it cannot run in daemon mode (else init(8) would continually restart it). This means conserver will not write a PID file, which makes it hard to rotate the log files.
So we start conserver from an rc.d script. If you installed conserver via the port, there will be a conserver.sh.sample file installed in /usr/local/etc/rc.d. Copy and/or rename this to conserver.sh to enable conserver to start at boot time.
In fact we use a modified version of this script which also connects conserver to a terminal via a tty device so we can monitor unwatched console output. Our conserver.sh script looks like this:
#!/bin/sh
#
# Startup for conserver
#

PATH=/usr/bin:/usr/local/bin

case "$1" in
        'start')
                TTY=/dev/cuaE7
                conserver -d > $TTY
                # get NL->CR+NL mapping so msgs look right
                stty < /dev/cuaE7 opost onlcr
		echo -n ' conserver'
                ;;

        'stop')
		kill `cat /var/run/conserver.pid` && echo -n ' conserver'
                ;;

        *)
                echo "Usage: $0 { start | stop }"
                ;;

esac
exit 0
Note: Note the use of cuaE0 device and the need to set tty modes for proper NL-<CR handling).
4.8 Keeping the log files trimmed
FreeBSD has a program called newsyslog that will automatically handle log file trimming. Just add some lines to the configuration file /etc/newsyslog.conf for the console logs:
#
# The log files from conserver
/var/log/consoles/gallows	644  10    1000 *     Z /var/run/conserver.pid
/var/log/consoles/kanga		644  10    1000 *     Z /var/run/conserver.pid
/var/log/consoles/roo		644  10    1000 *     Z /var/run/conserver.pid
This tells newsyslog (which is run from cron every hour on the hour) that the console log files should be archived and compressed once they reach 1Mb, that we should keep 10 of them, and that to signal the server program you send a SIGHUP to the process whose PID is in the conserver.pid file. This is the master server, and it will arrange to signal all the child processes. Yes, this will send a HUP to all clients whenever a single log file needs rotating, but that is quite cheap. See newsyslog(8) for details.
5 Cabling
This is always the hardest part of this kind of problem. We had only a dozen or so cables/headshells to build, and we already had a collection of the appropriate crimping tools and hardware, so we did it ourselves. But if you are not set up for this, or you have a large number of cables to make, then you might consider getting some cables custom made. Look in the yellow pages, there are a surprising number of places that do this! Getting custom-made cabling is good, and you can get much more professional results, but can be expensive. For example, the RJ-45 to DB-25 adapter kits described below are about $10 each; custom-made headshells are about twice that (and take a couple of weeks to arrive). Similarly, crimping custom RJ-45 to RJ-45 leads is quite cheap (say, $5 each) but it takes a fair amount of time. Custom made RJ-45 socket to RJ-45 plug converters cost about $25 each.
We have settled on RJ-45 Cat-V cabling for all our office and computer room cabling needs. This included patching between racks in the computer room. For serial connections, we use patchable headshells that have RJ-45 sockets on the back. This allows us to patch whatever RJ-45–DB-25 connections we need.
Which is just as well, because there are many incompatible ways to represent serial connections on the RJ-45 plug. So the cabling has to be very careful to use the right mapping.
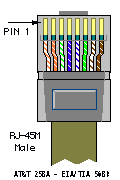
5.1 RJ-45 colors
RJ-45 cables and plugs have 8 pins/conductors. These are used as 4 matched pairs. There are a couple of conventions about how the pairs are mapped onto pins, but 100baseT uses the most common (known as EIA 586B). There are three common color-coding conventions for the individual conductors in RJ-45 cables. They are:
Table 1.
| Pin | Scheme 1 | Scheme 2 (EIA 568B) | Scheme 3 (EIA 568A) | Pair |
|---|---|---|---|---|
| 1 | Blue | White+Green | White+Orange | 2+ |
| 2 | Orange | Green | Orange | 2- |
| 3 | Black | White+Orange | White+Green | 3+ |
| 4 | Red | Blue | Blue | 1+ |
| 5 | Green | White+Blue | White+Blue | 1- |
| 6 | Yellow | Orange | Green | 3- |
| 7 | Brown | White+Brown | White+Brown | 4+ |
| 8 | White or Grey | Brown | Brown | 4- |
Note EIA 468A and EIA 568B are very similar, simply swapping the colors assigned to pair 2 and pair 3.
See for example the Cabletron Tech Support Site for more details.
The pins in the RJ-45 plug are numbered from 1 to 8. Holding a patch lead with the cable pointing down and the clip away from you, pin 1 is at the left. Or, looking into an RJ-45 socket with the clip to the top, pin 1 is on the right. The following illustration (shamelessly lifted from the Cabletron web site above) shows it pretty well:
We have four classes of equipment to deal with in our setup:
- Sun servers
-
Sun servers operate as DTE (i.e. send data on TxD and read RxD, and assert DTR) with a female DB-25 socket on board. So we need to create a headshell for the Stallion that operates as DCE and has a male DB-25 plug (i.e. acts as a “null modem” cable as well as converts from RJ-45 to DB-25). We use headshells that have an RJ-45 socket in them and 8 short flyleads with DB-25 pins on the end. These pins can be inserted into the DB-25 plug as required. This allows us to create a custom RJ-45-DB-25 mapping. We used a couple of different sorts, including the MOD-TAP part no. 06-9888-999-00 and the FA730 series from Black Box.
On our version of the headshells, these flyleads had the following colours (from Pin 1-8): Blue, Orange, Black, Red, Green, Yellow, Brown, White. (Looking into an RJ-45 socket, with the clip towards the top, pin 1 is on the right.) This is how they are connected to the DB-25 socket:
Table 2.
Stallion RJ-45 Pin Colour Signal Sun DB-25 Male Pin RS232 Signal 1 Blue DCD 20 DTR 2 Orange RTS 5 CTS 3 Black Chassis Gnd 1 Chassis Gnd 4 Red TxD 3 RxD 5 Green RxD 2 TxD 6 Yellow Signal Gnd 7 Signal Gnd 7 Brown CTS 4 RTS 8 White RTS 8 DCD Note that colours may be different for your cables/headshells. In particular, pin 8 may be grey instead of white.
Remember to label the headshell clearly, in a way that will not fade/fall off/rub off with time!
- Cisco 16xx/26xx/36xx Routers
-
I think that all Cisco gear that has RJ-45 console ports and runs IOS® will have the same cable requirements. But best to check first. We have tried this on 1600s and 2600s only.
Both the Stallion card and the 2600 have RJ-45 connections, but of course they are not compatible. So you need to crimp up a special RJ-45-RJ-45 cable. And this cable must be plugged in the right way round! We use normal RJ-45 flyleads from the router to the patch panel, then the special flylead from the patch panel to the Stallion card.
We built two special Stallion-Cisco leads by cutting in half a 2m flylead and crimping an RJ-45 with the appropriate pinouts to each free end. The original connector will be the Cisco end of the cable, the new crimped connector will be the Stallion end. Holding the RJ-45 connector on the flylead with the cable pointing down and the clip pointing away, this is the order of the colours of the cables in our flylead (pins 1-8, from L to R): white/green, green, white/orange, blue, white/blue, orange, white/brown, brown. For the Stallion end, trim and discard the brown/white+brown and green/white+green pairs. Then holding the RJ-45 plug in the same manner (cable down, clip away), the connections should be (from L to R): None, None, Blue, Orange, White/Orange, White/Blue, None, None, as shown:
Table 3.
Cisco RJ-45 Pin Colour Cisco Signal Stallion RJ-45 Pin Stallion Signal 1 White/Green RTS N/C 2 Green DTR N/C 3 White/Orange TxD 5 RxD 4 Blue Gnd 3 Gnd 5 White/Blue Gnd 6 Gnd 6 Orange RxD 4 TxD 7 White/Brown DSR N/C 8 Brown CTS N/C Note again that colours may be different for your cables/headshells.
Carefully label the cable, and each end of the cable, and test it. If it does not work, testing is really hard as they do not make RJ-45 serial line testers!
Let me state this more strongly: Be very sure that you label this cable in a way that is easily, instantly and permanently recognisable as a special cable and not easily confused with normal drop cables. Some suggestions (from Hugh Irvine):
-
Make them out of different coloured cable.
-
For marking the ends, clear heat-shrink tubing slipped over printed labels *before* putting on the connectors is the best way I have seen for marking what they are.
-
You can also use Panduit or similar tags that you put on with nylon tie straps, but I find the ink wears off the tags.
-
- Cisco Catalyst® switches
-
Astoundingly, the pinout on the console ports of the Catalyst switches is actually different to the pinout used on the 26xx-series Cisco hardware. I think the way to tell which is which is by considering the operating software. If it uses IOS, then the previous pinout is required. If it uses the switch software, then this pinout is required.
Fortunately, while the pinouts are different, the Catalyst pinout is simply a mirror image of the pinout for the 2600. Even more fortunately, the Ciscos (both Catalyst switches and 2600s) seem to ship with a special “rollover” cable, which is exactly what is required in this case. We use the rollover cable from the Catalyst switches to the patch panel, then the same cable as above for the 2600s from the patch panel to the Stallion card, and it all works just fine.
This rollover cable is an RJ-45-RJ-45 cable and is intended to be used with the shipped (hardwired) RJ-45 - DB-25 and RJ-45–DB-9 headshells for console connections. Ours are 2m long, either light blue or black, and are quite flat. Attempts to use them for 100baseT Ethernet will fail miserably! You can tell it is a rollover cable by holding both ends with the cable pointing down and the clip pointing away from you. Check the colour of the leads in each pin in the two connectors, they should be mirror images. (In our case, one goes grey-orange-black-red-green-yellow-blue-brown, the other brown-blue-yellow-green-red-black-orange-grey). This is a rollover cable.
If you do not have a rollover cable present, then you can use the same cable as for the 26xx except plug it in the other way around (i.e. original 8-pin plug goes into the Stallion, the new crimped plug with only 4 active wires goes into the Catalyst switch).
- FreeBSD servers (or any other i386™ PC systems using a serial console)
-
We run FreeBSD 4 on a couple of i386 PCs for various peripheral uses. FreeBSD usually uses a screen and keyboard for the console, but can be configured to use a serial port (usually the first serial port known as COM1 in DOS/Windows® or ttyd0 in UNIX).
The cabling for these servers depends on the PC hardware. If the PC has DB-25 female socket on board (as most older PCs do), then the same headshell as works for the Sun server above will work fine. If the PC has DB-9 male plug on board (as more recent PCs tend to do), then there are two choices. Either use a DB-9 to DB-25 converter (this is not recommended as it can lead to unreliable connections over the long term as the adapter is bumped/works loose), or build an RJ-45 to DB-9 cable as follows:
Table 4.
Stallion RJ-45 Pin Colour Signal PC DB-9 Female Pin RS232 Signal 1 Blue DCD 4 DTR 2 Orange RTS 8 CTS 3 Black Chassis Gnd N/C 4 Red TxD 2 RxD 5 Green RxD 3 TxD 6 Yellow Signal Gnd 5 Signal Gnd 7 Brown CTS 7 RTS 8 White RTS 1 DCD See Section 7 for tips on configuring FreeBSD to use a serial console.
6 On Sun Systems And Break
Anyone who has turned off a terminal used as a console for a Sun system will know what happens and why this is a problem. Sun hardware recognises a serial BREAK as a command to halt the OS and return to the ROM monitor prompt. A serial BREAK is an out-of-band signal on an RS-232 serial port that involves making the TX DATA line active (i.e. pulled down to less than -5V) for more than two whole character times (or about 2ms on a 9600bps line). Alas, this BREAK signal is all to easily generated by serial hardware during power-on or power-off. And the Stallion card does, in fact, generate breaks when the power to the PC fails. Unless fixed, this problem would mean that every Sun box connected to the console server would be halted whenever the power failed (due to dead power supplies, or fat-fingered operators unplugging it, or whatever). This is clearly not an acceptable situation.
Fortunately, Sun have come up with a set of fixes for this. For Solaris 2.6 and later, the kbd(1) command can be used to disable the ROM-on-BREAK behaviour. This is a good start, but leaves you out of luck in the situation where a break is needed to get into a broken machine.
Starting with Solaris 8, the kbd command can also be used to enable an alternate break sequence using the kbd -a alternate command. When this is set, the key sequence ReturnTildeCtrl-B (within 5 seconds) will drop to the ROM. You can enable this permanently by editing the /etc/default/kbd file; see the kbd(1) man page. Note that this alternate break sequence is only active once the kernel has started running multiuser and processed the default file. While the ROM is active (during power-on and during the boot process) and while running single-user, you still need to use a BREAK to get to the ROM prompt. The console client can cause the server to send a BREAK using the escape sequence Esccl1.
If you have a Sun software support contract, there are patches available for Solaris 2.6 and 2.7 that add the “alternate break” capability integrated into Solaris 2.8. Solaris 2.6 requires patch 105924-10 or higher. Solaris 2.7 requires patch 107589-02 or higher.
We have added this patch to all our Solaris 2.6 servers, and added it (and the entry in the /etc/default/kbd file) to our jumpstart configuration so it will automatically be added to every new install.
We have confirmed by direct testing that neither the Cisco 16xx, 26xx, or Catalyst hardware suffers from the BREAK sent when the Stallion card loses power. Contemporary Cisco software listens for BREAK signal only for first 30 seconds after power-on or reboot.
7 Using a Serial Console on FreeBSD
The procedure for doing this is described in detail in the FreeBSD Handbook. This is a quick summary.
7.1 Check the kernel configuration
Check that the kernel configuration file has flags 0x10 in the config line for the sio0 device. This signals this device (known as COM1 in DOS/Windows or /dev/ttyd0 in FreeBSD) can be used as a console. This flag is set on the GENERIC and LINT sample configs, so is likely to be set in your kernel.
7.2 Create the /boot.conf file
This file should be created containing a single line containing just “-h” (minus the quotes). This tells the FreeBSD boot blocks to use the serial console.
7.3 Edit /etc/ttys
Edit this file and make the following changes.
If you are not going to have any keyboard/video screen on this server at all, you should find all the lines for ttyv devices like
ttyv1 "/usr/libexec/getty Pc" cons25 on secure
Change the on to off. This will stop login screens being run on the useless video consoles.
Find the line containing ttyd0. Change it from
ttyd0 "/usr/libexec/getty std.9600" dialup off secure
to
ttyd0 "/usr/libexec/getty std.9600" vt100 on secure
(replacing vt100 with the term type of your console. The xterms terminal type might be a good choice). This allows you to log in to the console port once the system is running multi-user.
Reboot and off you go!
8 Security Implications
The client-server protocol for conserver requires the user of the console client to enter a password. This password is passed across the net in cleartext! This means conserver is not really suitable for use across untrusted networks (such as the Internet). Use of conserver-only passwords (in the conserver.passwd file) slightly mitigate this problem, but anyone sniffing a conserver connection can easily get console access, and from there prang your machine using the console break sequence. For operating across the Internet, use something secure like SSH to log into to the server machine, and run the console client there.
9 On Conserver Versions
The conserver program has fractured into a number of
versions. The home page referenced below seems to be the latest and most featureful
version around, and for July 2004 carries a version number of “8.1.9”. This
is maintained by Bryan Stansell <bryan@conserver.com>, who has brought
together the work of many people (listed on his webpage).
The FreeBSD ports collection contains a port for version 8.5 of conserver at comms/conserver. This seems to be older and less featureful
than the 8.1.9 version (in particular, it does not support consoles connected to terminal
server ports and does not support a conserver.passwd file), and
is written in a fairly idiosyncratic manner (using a preprocessor to generate C code).
Version 8.5 is maintained by Kevin S. Braunsdorf <ksb+conserver@sa.fedex.com> who
did most of the original work on conserver, and whose work
Bryan Stansell is building on. The 8.5 version does support one feature not in the 8.1.9
version (controlling power to remote machines via a specific serial-interfaced power
controller hardware).
Beginning with December 2001, Brian's version (currently 8.1.9) is also presented in ports collection at comms/conserver-com. We therefore recommend you to use this version as it is much more appropriate for console server building.
10 Links
- http://www.conserver.com/
-
Homepage for the latest version of conserver.
- ftp://ftp.conserver.com/conserver/conserver-8.1.9.tar.gz
-
The source tarball for version 8.1.9 of conserver.
- http://www.stallion.com/
-
Homepage of Stallion Technologies.
- http://www.conserver.com/consoles/msock.html
-
Davis Harris' “Minor Scroll of Console Knowledge” contains a heap of useful information on serial consoles and serial communications in general.
- http://www.conserver.com/consoles/
-
The “Greater Scroll of Console Knowledge” contains even more specific information on connecting devices to various other devices. Oh the joy of standards!
- http://www.eng.auburn.edu/users/doug/console.html
-
Doug Hughes has a similar console server, based on the screen program and an old SunOS™ host.
- http://www.realweasel.com/
-
The Real Weasel company makes a ISA or PCI video card that looks like a PC video card but actually talks to a serial port. This can be used to implement serial consoles on PC hardware for operating systems that can not be forced to use serial console ports early enough.